
Lesson
The lesson activity module enables a teacher to deliver content and/or practice activities in interesting and flexible ways.
A teacher can use the lesson to create a linear set of content pages or instructional activities that offer a variety of paths or options for the learner.
Teachers can choose to increase engagement and ensure understanding by including a variety of questions, such as multiple choice, matching, and short answer.
Depending on the student's choice of answer and how the teacher develops the lesson, students may progress to the next page, be taken back to a previous page, or directed down a different path entirely.
A lesson may be graded, with the grade recorded in the Gradebook.
What is Lesson for?
-
Self-directed learning of a new topic: use the lesson to introduce a new topic, learners can progress at their own pace, reviewing what they is not sure of and moving on when they feel ready.
-
Allow for different learning styles: For example the button "do you prefer to read?" goes to a page of text; "do you prefer to watch a video?" goes to a screen cast; "do you prefer to listen to instructions?" -goes to a podcast and so on.
-
Role play simulations/Decision-making exercises: Use the lesson to set up situations where the learner has to make a choice each time and the scenario changes according to their selection. It can be used for a medical emergency case, how to deal with an awkward client or a customer service exercise
-
Interactive fiction: choose your own ending type of story
-
Differentiated revision guides: Students can be taken to different sets of revision questions according to their answers, allowing them to progress from basic to intermediate to advanced according to their prior knowledge.
What is Lesson?
Before you add an Lesson :
You need to have a clear idea beforehand of what you want to do with this lesson.
Is it gonna be a graded, linear learning experience? Or an ungraded, non-linear practice session? Will students be able to go back and revisit areas or is it just a once-only opportunity?
Even those who are very comfortable working directly online might find it useful to note down on paper the direction they want their lesson pages to go in, rather than having to remember and visualize the navigation in their head.
Lesson setup
General
In the General section, give your lesson a Name, a Description if needed, and tick the box below Description block if you wish that description Displayed on the course page.
Appearance

Linked media
If you want to include a link to a media file for students to refer to, upload it here.
A 'Click here to view' link will be displayed in a block called Linked media on each page of the lesson.
The width and height of the pop-up window may be set by an admin in Site administration > Plugins > Activity modules > Lesson.
Progress bar
Choose this to show a bar at the bottom of the page showing how far into the lesson the student has got.
-
For lessons containing only Content pages, once a lesson has been taken to the end, if that same lesson is re-taken, the progress bar will not be "reset", i.e. it will show a 100% progress from page 1!
-
For lessons containing Question pages and set to "Re-take" Yes, the progress bar is always "reset" at 0% upon re-take.
-
Note that the Lesson Progress bar only works correctly for lessons with a "straightforward" navigation, such as page 1 -> page 2 -> page n -> end of lesson. It is not guaranteed to work with pages "jumping all over the place" (which you can reset in 3 Action after correct answer).
Display ongoing score
Choose this to let students see their score as they work through the lesson.
Display menu
Choose this when you want to show a list of the content page titles in the Lesson to the student.
Only those pages which have "Display in menu?" checked will display.
The menu will not display question pages.
Minimum grade to display menu
Choose this if you want the student to go through the lesson once and get a grade before they can (on review) see and navigate through all the different pages.
Slideshow
Slideshow height, width and background color are set for the whole site by an administrator in Site administration > Plugins > Activity modules > Lesson.
Maximum Number of Answers
Here you can set the default number of selection boxes available when you add or edit a question or content page.
For instance, if you are only going to use Multiple Choice questions with 3 answers in your lesson, you might select 3. You can change the default here at any time to display more or less question answers or content choices.
Note: This only impacts the editing screen. Changing from 4 to 2 will not remove or hide any answers previously entered from the student.
Use default feedback
Every Moodle site has a standard response (feedback) when a student selects a correct or wrong answer in a lesson.
Select "No" if you only what you put as a response for a specific question' s answer to display.
In this case, when you leave the response to a question blank, the student will not see any comment about their answer. The typical Moodle standard responses are: "That's the correct answer" or "That's the wrong answer".
Link to next activity
Choose this to give students a link to another activity when they reach the end of the lesson.
Availability

Time limit
This allows you to set a time limit on the lesson which can now be seconds, minutes, hours, days or weeks. Students will see a countdown counter in a block as they work.
(Note that this does not work if the lesson is downloaded for offline use via the mobile app.)
The timer does not stop them doing the lesson when the time is up, but correct answers are no longer scored.
Password protected lesson
Change to "Yes" and enter the password if you want students only to access it when they know the password.
Flow control
Flow control can be really confusing, check cases 123 here.

1 Allow students to review: This puts a "Review Lesson" button on the last screen of the lesson to encourage the students to navigate through the lesson again. If the lesson contains questions then the review will start from the first question, otherwise the review will start from the first content page.
Note that the students will not be able to change their answers, only view them.
2 Provide option to try a question again (Work together with Maximum Number of Attempts):
This displays a button after an incorrectly answered question so that the student can try again (but not get credit for it).
If the student clicks to move on to another question then the selected (wrong) answer jump will be followed.
By default wrong answer jumps are set to "this page", so it is recommended that you set the wrong answer jump to a different page to avoid confusion with your students.
TIP: Leave this off if you are using essay questions.
Maximum Number of Attempts:
Decide here how many times you want students to be able to attempt each question. When they reach the maximum, they will be taken automatically to the next page.
Note: (Work together with Provide option to try a question again) this setting works in combination with the above setting, or independently.
-
When Provide an option to try again is set to No, students will be able to retake the question as many times as it is set here, with a score penalty.
-
When Provide an option to try again is set to Yes, then students will be able to retake the question as many times as it set here without a score penalty. In this case an extra dialogue appears.
Consequently when the relevant jump to 'this page' is used for wrong answer while the Provide an option to try again is set to No and Maximum number of attempts is set to 1, a student who answers wrong will be moved to the next page, since the student only has one opportunity to attempt the question.
Tip: Ensure you check Lesson using a real student account, as the teacher preview or the Switch role to student may not give you the exact picture.
3 Action after correct answer:
Choose here where you want a student to be sent to if they get a question right.
The options are:
- the next part of the Lesson (default setting)
- a random, unexpected page
- a random page which they have not yet answered
Number of pages to show:
You only need this if you have set Action after a correct answer to show an unseen or unanswered page. Otherwise, all pages will be seen.
Grade

Practice lesson
Practice lessons are now saved; this means they will appear in the reports.
You must enable the Re-takes allowed setting if you want students to be able to attempt a practice lesson several times.
Custom Scoring
Use this to give a particular number score (negative or positive) to each answer
Re-takes allowed
Choose this if you want your students to be able to do the lesson more than once.
Handling of re-takes
If you allow your students to re-take the lesson, then decide here if the grade for all lesson attempts is the mean or the maximum.
Minimum Number of Questions
Set the minimum number of questions that will be used to calculate a student's score.
Students will be told how many questions they have answered and how many more they need to answer.
-
If you are using Content pages, then set this to 0.
-
If you use this setting, then add some explanatory text at the start of the lesson so the student knows the minimum number of questions they must answer to receive a grade.
After you have created the lesson, it is possible to override certain settings for individuals and groups from Lesson administration.

Group overrides/User overrides
In situations where two group overrides may apply to a single user, the most lenient date is used.
Available from: the earliest possible date is used
Deadline: the latest possible date is used.
Note also that if there exists a user override for a student, it will always take precedence over any group overrides.
It is possible to override passwords, availability/deadline, time limits and question retries and lesson retakes.
From the next screen you can choose the user or group to override and the settings you wish to override:
When the override is saved, it is displayed on a screen along with any other overrides previously set:

Adding content and questions to your lesson

Import questions
If you have some questions in the following formats, you can import them to use in your lesson by clicking the Import questions link.

Add a cluster
A cluster is a group of question pages which will be offered randomly to a student as they work through the lesson.It is best if you have made the question pages beforehand and can then decide where to mark the start and end of the cluster. The start is marked by a "cluster" page and the end by an "end of cluster" page.
Add a content page
This is a page where teachers can provide information to move the lesson forward but without requiring the student to answer specific questions.
The student sees the page's title, some information and then one or more buttons at the bottom to select.
When the student clicks on a button, they go to the next page but their choice is not scored.
Jump
-
Each Description in a Content page has a Jump menu. Jump take a student from one page to another.
-
A "relative jump" is "next page" or "end of lesson" whereas an "absolute jump" gives the actual name of a page.
-
The teacher chooses the correct page to send the student to from the drop down if they click on the button that will be made from this particular description. Any pages created by the teacher will have their titles appear in this drop down, allowing them to be selected.
-
When a student clicks on a description button, they are sent to the page defined in the Jump associated with the button.


Add a question page

You can choose from a variety of question types which will be added as pages to your lesson:
E.g: Multichoice
A typical question page could include:
-
Title - the name the student sees at the top of the question page.
-
Page contents - the actual question
-
Answer: Type the provided options
-
Response: If you don’t use default feedback, type the feedback you want to provide after student choose the exact option.
-
Jump: Decide where to send student to next
-
Score: How much score you want to give if student choose this option.

Question Type [Table]
![question type [Talbe].png](https://static.wixstatic.com/media/d189e8_cb2a158b33cd47e789d0e9f1cdeafc51~mv2.png/v1/fill/w_507,h_295,al_c,q_85,usm_0.66_1.00_0.01,enc_avif,quality_auto/question%20type%20%5BTalbe%5D.png)
Note: Question type are different from Quiz questions.
Text editor type [Table]
![text editor [Table].png](https://static.wixstatic.com/media/d189e8_ad0a381912b94bcd902d14aed6809a39~mv2.png/v1/fill/w_600,h_175,al_c,q_85,usm_0.66_1.00_0.01,enc_avif,quality_auto/text%20editor%20%5BTable%5D.png)
Move your lesson forward
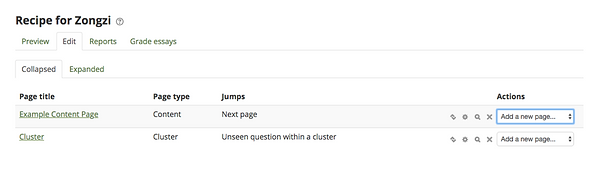
Once you have added your first content or question page, you reach the next screen which displays your page title/type/jumps (e.g: where the responses take the student to) and actions you can take next:
Actions:
The icons in front of the drop down menu allow you to move (if you have more than one page), edit, preview, delete or (New in 3.2) duplicate your pages.
The drop down allows you to create another page of your choice:
